Pages

Thursday, April 7, 2011

Cajun-Style Beans and Rice

This is a post that I created a few years back on another blog that I have long abandoned.  I decided to make this recipe today (The last time I made it was in 2006) and it turned out just as good as I remembered. 

In the version I made this evening, I used smoked neck bones and black beans.  Smoked neck bones are pretty cheap at about $2/lb and that is enough to make a pretty good size batch of beans.  If you don't have bacon, don't go running to the store to pay $4 for a package.  I didn't have bacon so I did without, and the results were just as good.   I also didn't have red beans...  But I always have black beans on hand so I improvised.

A little nutritional info...  A cup of black beans has over half your daily intake of fiber and is a good source of protein.  And it is no coincidence that beans and rice are eaten together.  When combined, the two become a complete protein (contain all 9 essential amino acids).


Tonight I had cajun-style black beans and brown rice.

Here is my recipe for red beans and rice that I posted five years ago.

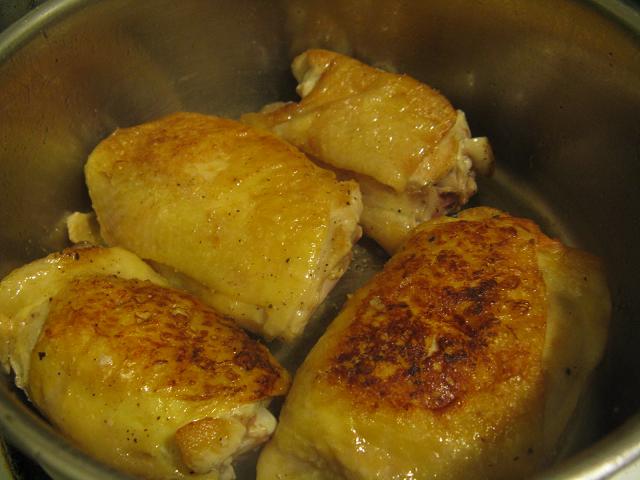
1. Sweat garlic, onions, celery and bell pepper in oil until garlic and onions become translucent. Add thyme, cayenne and black pepper. If using bacon, cook before adding vegetables. Use bacon greese instead of oil to sweat vegetables.


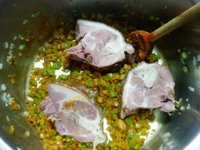
2. Add smoked neck bone or smoked ham hock (pictured)


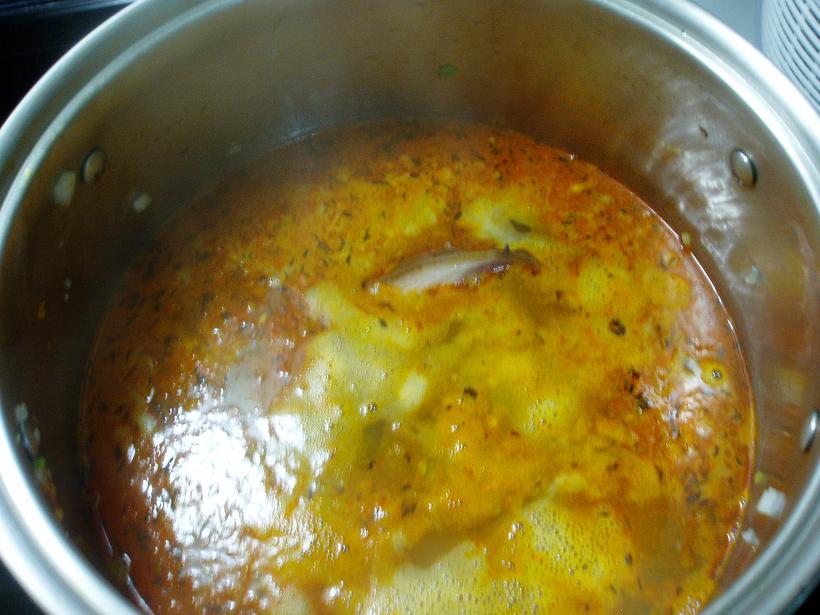
3. Add enough water to cover contents of pot.


4. Simmer until water is reduced by about half and pork meat becomes tender. Remove pork from pot, set aside to cool. Add beans to pot and continue to simmer. Once ham hock/neck cools, remove the meat from the bone, shred and add to pot. Keep cooking over low heat until there is only enough liquid to barely cover contents of the pot (as pictured).


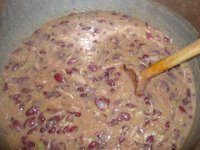
5. Mash half the beans against pot with a wooden spoon. It should have the consistency of stew. If it seems too watery, keep cooking over low heat until some of the water evaporates and the beans become thick (make sure to keep stirring, because once mashed, the beans will burn easily). Adjust seasonings and serve with rice.


This recipe is nothing fancy, but makes for a pretty good side dish. I think it goes well with fried catfish and a piece of homemade cornbread. You can add as little or as much cayenne as you'd like... Just remember, cayenne is VERY spicy so add in a little at a time or you might find yourself choking down a gallon of water or even worse... sitting on the toilet for days.

I've made this dish a couple of ways, a couple of times with the pork neck and bacon and once with just the ham hock. While the ham hock yields more meat, I have to say I think it tastes better with the neck bone and bacon. The ham hock has a lot of fat, so if you're going to use it remember to skim off the grease that floats to the top of the pot.

Have ready...

2 cans red beans
1 pound smoked pork neck bone or smoked ham hock
3 piece of bacon (cut into 1/2" pieces)
1/2 c each onion, celery, bell pepper (1/4" dice)
3 cloves garlic
1 teaspoon dried or fresh thyme
2 bay leaves
1 tablespoon cayenne
salt and pepper to taste

In a large pot, over medium heat, cook bacon. Once most of the fat has rendered out of the bacon, add the onion, celery, bell pepper and garlic. Cook vegetables until onions become translucent. Add thyme and cayenne and mix with the bacon-vegetable mixture. Put neck bone into pot and add enough water to cover entire contents of pot. Turn heat on high. When the water begins to boil, turn heat down to a medium low (the water should be simmering). Cook for about an hour and a half.  Remove neck bone from pot, but continue to keep pot of vegetables on heat. With a fork, remove meat from neck bone (there won't be much of it). Add meat to pot. Season to taste with salt, pepper and cayenne (if necessary). Add red beans and cook until beans are heated through. If it seems that there is a lot more liquid than beans, continue to cook until some of that liquid evaporates. With a large spoon, mash half the beans in the pot. Season to taste. Serve with rice.

Tuesday, March 22, 2011

Our days off and a recipe for black bean and corn salad

Matt and I finally had two days off together for the first time in quite a while.  My boss is really good about trying to make my schedule work with Matt's but, with work being busy, sometimes things just don't work out. 

On our weekend off together, we went to yard sales, the farmers market, stopped in town for ice cream, soaked up some sun on the beach and just sat on our porch, watched the ocean and enjoyed the beautiful weather.  Needless to say, blogging didn't really cross my mind.

Animal, Vegetable, Miracle: A Year of Food Life (P.S.)I was also able to get through a good chunk of a book that I'm reading, titled Animal, Vegetable, Miracle: A Year of Food Life (P.S.).  It was sent to me a while ago by Matt's mom and I finally had some time to really dive into it.  If you have ever considered starting a garden or buying your produce locally, read this book and I believe that you will, at the very least, give some serious thought about the items you are placing in your grocery cart.  I know that I will.  My goal this summer is to try and purchase most of my produce from local growers at the farmer's market.  Maybe by the time I'm finished with the book I will be so inspired that I'll stop tripping over myself because I'm sprinting out the door to get to the store to grab a box of corn flakes for $0.50 (side note... industrialized corn and soy beans are major players in our nation's problem with obesity and a huge reason why we've lost so many small farms in the past few decades).

And, because I'm not much of a believer in being an extremist...  Here is a recipe for black bean and corn salad that we made on one of our days off (I bought a frozen bag of corn for $0.15 at Publix the other day).
One of these days I would like to live off the land a little more and rely less on coupons.  One of these days...  But not yet.

I once bought a black bean and corn salad from Starbucks for about $4 and, although really tasty, it was waaaay overpriced.  I made a similar salad for less than $0.50/serving.


Black Bean and Corn Salad


In a bowl, mix together:

Black beans (I use canned)
Corn kernels (Canned, frozen or fresh)
Chopped Cilantro
Diced tomato (I used canned because I had some leftover but, of course, you can use fresh)
Diced jalapeno (if you like a little heat)
Clove of garlic
Chopped onion or green onion
Squeeze of lime juice
Pinch of cumin
Pinch of sugar
Salt and pepper

Monday, March 14, 2011

Let us be thankful

Three days ago I woke up to a text message from my sister saying that there was an 8.9 magnitude earthquake in Japan.  She followed by telling me that my family was okay but had to evacuate to higher ground because of a tsunami warning.  I was still a little confused as I turned on the tv and...  There it was on the news.  Even at the time I did not realize the magnitude of what had just happened.  All I knew was that my family was safe.

Over the next couple of days, I followed the news and came to understand just how devastating this earthquake was.  Every day the death toll rises and hundreds of thousands are left without a home.  It hits you hard knowing that your family could have easily fallen victim to this disaster.

In an instant your life can be turned upside down, and tomorrow you can be without everything you have today.

So let us be thankful.

I am thankful for everyday that my world is left undisturbed and peaceful.  I am thankful that I have a roof over my head and food to eat.  I am thankful that my loved ones are alive and safe. 

There are a lot of people, right now, who don't have much to be thankful for.  If you have something to be thankful for, please consider helping those who are less fortunate.

Thank you for reading.

If you would like to help the earthquake victims of Japan, the American Red Cross is accepting donations.

Friday, March 4, 2011

Shredded Chicken Burritos

Here's something else I made on my freezer cooking day - Shredded chicken burritos.  I finally got the chance to test out the crock pot that Matt and I received from my mom for Christmas.  This thing is incredible.  Not only is it a slow cooker (and huge - Do you see that it fits an entire chicken?) it is also a pressure cooker AND rice cooker ANNND it has browning capabilities (Meaning you can sear your meat and saute your vegetables in the crock pot).

I've used my new toy to make rice a couple of times but this was the first time I used the slow cooker capability.  Since I was busy trying to get so much stuff done, it was really convenient for me to throw a bunch a ingredients in a pot, close the lid and let it do it's thing for eight hours.

The burritos turned out nice and they freeze really well.  I was able to make ten large burritos with one whole chicken.  After the chicken was done cooking, I was left with some really nice stock (which I also froze) and that will probably be used to make chicken chili later on.

Like always, I tried to use what was in my kitchen.
How do I get my groceries for so cheap?  Go here to see how I shop.
  • Whole chicken $2.80 (Harris Teeter still has them on sale for $0.59/lb!)
  • Bag of shredded cheese: $0.25
  • Can of tomatoes: $0.50
  • Can of black beans: $0.50
  • Tortillas: $2.50
  • Sour cream: $.10
  • Pace Picante Salsa Verde, 1/2 jar: $0.70
  • Onion scraps, cilantro stems, garlic
The total cost of one dinner-sized burrito is about $0.75 (with great stock leftover!). 


Chicken, onion scraps, garlic, cilantro stems, canned tomatoes, cumin, chili powder, salt and pepper all go into the crock pot.

***
Set the timer for 8 hours and go about my business.

***
When eight hours have passed, remove the pot from the cooker and cool.  Refrigerate overnight and the next day it will look like this.  Scrape the fat off the top and remove the chicken from the jelly-like broth.  Shred the chicken.

***
 Put the broth into a pot, heat and strain.  Reserve some liquid for the chicken, freeze the rest for later use.

***
Put shredded chicken into a pot and add salsa verde, cumin and a little stock.  Add sour cream (or cream cheese, like we used to do at my old culinary school) for a little richness.  Add black beans, salt and pepper.  Finish with chopped cilantro. 

***
Set tortillas on parchment paper (not to be confused with wax paper) and spread a thin layer of sour cream.  Top with chicken and cheese.

***
First, roll burritos.

***
Then, roll in parchment.

***
Last, if you are like me and don't own a microwave, roll in foil.  Otherwise, roll in plastic.  Store in airtight bags and freeze.

***

Thursday, March 3, 2011

Being A Kid Again - Mac and Cheese and Hot Dogs

Before I begin this post, I am excited to announce that I was featured in a blog created by my friend Stacy.  I have known Stacy for quite a few years now and she is one of the nicest people you'll ever meet.  We were in the Air Force together, a few years back, and the last time I saw her she was the mother of one little baby boy.  Now she is the proud parent of three beautiful children.  Stacy is the author of Kids Stuff World and writes about being a mother, taking care of the home and life in general.  Read about her adventures here and the really nice blog post about me here


Sometimes Matt and I do things that remind us of being young again...  Riding our bikes to the ice cream shop, bringing our mattress into the living room (I used to love sleeping in the living room as a kid) and eating mac and cheese and octopus-shaped bbq hot dogs for dinner.

The mac and cheese is homemade with bechamel, sauteed onions, cheddar and a little gorgonzola (recipe and method coming soon) and I usually get the Hebrew National All Beef Franks when they are BOGO at Publix.  Hebrew National hot dogs contain no by-products, artificial flavors or colors and are really tasty, in my opinion.

It is common, in Japan, to put octopus-shaped hot dogs in children's lunch boxes.  They call it taco weinna- which means octopus wiener.  And by wiener, I mean hot dog.  I think they're really cute and something that children will enjoy.

To make taco weinna-

  • First cut the hot dogs into thirds.
  • Cut a cross into one end of the hot dog pieces, the cuts should go up 1/3 of the way (Fancy graphic below).
  • Heat frying pan on medium-high heat with a little oil.  Add hot dogs. 
  • Add a little water to steam the wieners and the legs should start to curl out.
  • When all the water has evaporated and the hot dogs are heated through, add BBQ sauce. Serve.

Monday, February 28, 2011

Pizza Pockets

Growing up my mom would make these things called pizza pockets.  She would smoosh two pieces of biscuit dough (Pillsbury Grands) together and flatten it.  Then, she would top with cheddar cheese and meat sauce (sometimes there would be little smokies sausages in the sauce), fold it over to look like a little pocket, and bake them in the oven. 

I know most people don't think cheddar cheese and meat sauce when it comes to pizza, but in my parents' house that's the way it was.  The pizza pockets and homemade pizza usually had ground beef and cheddar cheese as the toppings. 

My siblings and I looked forward to the days my mom made pizza pockets (especially my sister), not only because they were delicious but because it meant we weren't having something like...  Cabbage and Spam stir fry (Hi mama!).  I have changed some things, like using pizza dough instead of biscuits, but the original way is really great too - Especially if you already have biscuit dough in your fridge.

After baking and freezing, I tested these suckers out in the microwave to see how they'd taste after being nuked.  Because bread gets chewy after being heated in the microwave, I wouldn't recommend doing so...  Although, they weren't bad.  I think it would be better to heat in the oven (Matt and I don't have a microwave anyway so we heat everything in the oven, I used the microwave at work for test purposes).

I purchased pizza dough from the Publix  bakery (A lot of grocery stores carry pizza dough) and had leftover meatsauce from making freezer lasagna.  I have a pretty large stock of spaghetti sauce and cheese that I purchased for really cheap (Go here to see how I shop).  To keep my food cost low, I use coupons, buy what's on sale and use what I already have in my kitchen.

Here's what I used:

Pizza dough (1 lb. cut into 6 pieces)
Lean ground beef
Ground pork sausage
Onions
Garlic
Pasta sauce
Cheddar cheese
Mozzerella cheese


 Cut pizza dough into six pieces and flatten with hands or rolling pin...  Or in my case the water bottle pictured in the background.  After you roll out all the dough the first time, it will most likely shrink.  Give it a couple of minutes to rest and roll out one more time.

If you want to use biscuit dough, smoosh two pieces of bisuit together and flatten (you will probably need flour).

Make a meatsauce with whatever you like.  Like I said earlier, my mom added little smokie sausages to her sauce.  I used garlic, onion, ground sausage, ground beef and mushrooms.  Cook it for a little while on low heat so that the sauce isn't too watery.  Too much liquid will prevent the pizza dough from sealing.  Make sure the sauce has cooled down before using it.
 Place, on top of the dough, your toppings.  I used meatsauce, mozzerella, cheddar and more mushrooms.

Fold the dough over itslef to create a little pocket.  Pinch closed.  Try your best to make sure it is sealed tightly.  Use a little water if need be. 


Bake between 375- 400 degrees (Biscuits may be different, check the temperature on the can) until they look like this.

Wrap tightly, and freeze.

Sunday, February 27, 2011

My Days Off

Well, it's been five days since my last post and I was able to get a lot of things done since then.  Besides trying to get our home together, another reason why I haven't been blogging as frequently is because it's been so beautiful the past few days that Matt and I have been spending more time outside (we are steps from the beach).

Organizing my coupons and taking care of my container garden will always be a work-in-progress, but I crossed them off for now because I did what I had intended.  All in all, I am happy with what I was able to accomplish on my days off.
  •  Clean freezer/fridge
  • Put away clothesGo shopping
  • Organize coupons
  • Organize towel closet
  • Purchase soil, start working on my container garden
  • Make granola
  • Do some cooking to stock up freezer - So far I will be making burritos, lasagna and mac and cheese
  • Get some paperwork done that I should have done months ago
  • Oh, and clean the house in general

 As far as cooking goes, I was able to make:
  • 10 Chicken burritos
  • 3 Pans of lasagna
  • 12 Pizza Pockets
  • Granola

The burritos, lasagna and pizza pockets are wrapped and stored in the freezer.  I also have really good chicken broth that came from cooking a whole chicken (for the burritos) in the slow cooker that my mom bought us for Christmas.  I am really excited about how everything turned out and hope to post about my freezer cooking day soon (maybe tomorrow). 

Now, I'm off to my job to work with chocolate.

Tuesday, February 22, 2011

Goals For This Week

It feels like it's been a busy week.  There's been quite a bit of work to do in the pastry kitchen and it leaves me with very little energy at home to do anything except a small amount of cooking and cleaning.  But tomorrow I have the day off and, now that the warm weather has finally shown it's face in these parts, I am itching to do some serious spring cleaning, gardening and a little freezer cooking. 

It overwhelms me to think of all the chores that lay ahead, so I wrote out a list.  I am generally not a list writer, that's Matt's forte, but tomorrow is one of those days where I will need to stay focused in order to get everything accomplished. 

Here is the plan for the next two days...

  • Clean freezer/fridge
  • Put away clothes
  • Go shopping
  • Organize coupons
  • Organize towel closet
  • Purchase soil, start working on my container garden
  • Make granola
  • Do some cooking to stock up freezer - So far I will be making burritos, lasagna and mac and cheese
  • Get some paperwork done that I should have done months ago
  • Oh, and clean the house in general
Hopefully I will get some blogging time in too.  I am excited to share the results of my freezer burritos and lasagna once they're finished!

Today I am going to leave you with some photos of desserts, that were produced by myself and the rest of the pastry team, for a Valentine's Day buffet.  Enjoy!


Tuesday, February 15, 2011

How To Poach an Egg


Whenever Matt and I have the morning off together, and have a little extra time, we usually try and eat something other than oatmeal or pizza toast (don't judge, it's still toast) for breakfast.  Just this morning, Matt made me huevos nachos.  A cross between huevos rancheros and nachos, huevos nachos is two poached eggs on top of...  Well, nachos.  Sounds tasty?  It is.  Sounds horrible for your waistline?  Maybe...  A little?

Me standing on my soap box...

As with most of the food I post on this blog, the recipes feature a combination of healthy and natural ingredients mixed in with a little guilty pleasure.  I would prefer not to eat boiled eggs and dry toast for the rest of my life but I do believe in eating with the purpose of fueling my body.  In general, Matt and I don't use a lot of convenience products and we try not to keep junk food around.  When we cook, we use vegetables, whole grains, real stock (no msg) and products made from ingredients that are naturally found on this earth.  Of course, we use butter, cream and cheese as well...  That's the part of the meal that fuels the soul (and contains calcium!) which, I feel, is just as important as taking care of the physical body.

I firmly believe that if we removed 100 calorie snack packs and low-fat frozen meals from our diets and replaced those items with natural, wholesome food that had to be prepared in order to eat it, people would live healthier, happier lives.  But...  That's just my take on things.  I don't claim to be right (I also don't claim to be perfect...  Ever see a person eat an entire box of Cheez-Its before?), I just wanted to explain a little of what this blog is about. 

Stepping off the soap box...

Okay.  Sorry about that.  Back to poached eggs.

Poaching eggs used to intimidate me.  There seemed to be so many factors that could result in a poorly poached egg...  But it's really quite easy.  And, of course, budget friendly!


Here's what you need to know:

  • You need a pot that is large enough to ensure that the eggs will be completely submerged in water and that there will be enough room so they are not sitting on top of each other.
  • The temperature of the water needs to be between 160-180 degrees Fahrenheit, but you don't need a thermometer. Bring the water to a boil and then lower the temperature to below a simmer (occasional bubbles rising to the surface).
  • The water should contain some acid so the whites coagulate nicely- About a tablespoon of vinegar will be good.
  • When dropping the eggs into the water, first crack into a ramekin (or small bowl) and gently slide the egg into the water, one at a time.
  • Place a lid on the pot, turn off heat, and leave the eggs undisturbed for 3 minutes (this will create a firm white and runny yolk).
  • Gently remove the egg using a slotted spoon (or spatula because that's all I have) and blot dry on paper towel.

Gently drop egg into water.  Notice...  There are barely any bubbles rising to the surface.
    ***
     A pot this size is perfect for about two eggs.  Slide them in one at a time.
    ***
    Once both eggs are in the water, cover with a lid and set your timer for 3 minutes.
    ***
     Once the timer goes off, remove eggs from the water and blot dry on paper towel.
     ***
    Season with salt and pepper and serve with toast, on top of nachos or in this case... 
    With roasted potatoes, fresh tomatoes, green onions and a little horseradish sour cream.

Saturday, February 12, 2011

Peanut Butter Smoothies


I used to work at a little coffee shop in Golden, Colorado where we used to make the best peanut butter smoothies.  I would often have one for breakfast or lunch, sometimes with a little protein powder, to keep me fueled until my shift was over.  I don't work at the coffee shop anymore but I still love to make these at home.  If you're ever in downtown Golden, make sure to stop by the Windy Saddle.

I bought my sister a blender for Christmas for the sole reason of being able to make these.  Ami loves anything cute, mashed potatoes, photography and peanut butter.  She lives in California where smoothies are appropriate at anytime of the year and she has been asking me to create this post for a little while now.  So, here it is Ami.  Hope you like it.

Aside from the chocolate syrup, this smoothie is really quite healthy.  It's also budget friendly!  I found a three pound sack of bananas at the store for $0.87 the other day.  They were starting to turn a little brown but in a smoothie, the riper the fruit the more sweetness it will add to the drink.  If you have a lot of bananas, and don't plan to use them anytime soon, peel and freeze them.  You can take it right out of the freezer and throw it into your blender.

What you need:

Ice
Milk
Yogurt
Peanut butter
Chocolate syrup or powder (or you can use chocolate milk)
Banana


For a 16oz glass:

Fill cup to the top with ice.  Pour milk over ice until it reaches half way up the cup, dump into blender.  Add a spoonful of yogurt, a heaping spoonful of peanut butter, a squeeze of chocolate syrup and half a banana.  Blend, using ice crush option if available.  Add more ice or milk, depending on desired consistency.

Wednesday, February 9, 2011

Whole-Wheat Pasta Caprese Salad

This is something I eat quite frequently, especially in the summer when my herb pots are flourishing. Whole wheat pasta takes some getting used to, but the nutritional benefits of eating it are worth giving it a shot.  I  usually buy Walmart brand pasta, it is actually pretty good and only $1 a box.  The thin spaghetti is my favorite.

Like always, I try and use whatever is in my kitchen.  Here's what I had:

  • Whole-wheat pasta - $1/box (I used 1/2 a box)
  • Fresh Garlic
  • A roma tomato - 1.99/lb
  • A small handful of organic spinach - $1/5 oz
  • Fresh mozzerella - $1/1 lb (I used 2 oz)
  • Grated Parmesan/Romano/Asiago mix - $2.50/7 oz (I used about 1/2 oz)
  • Balsamic Dressing - 8 oz bottle for free
How do I get my groceries for so cheap?  Go here to see how I shop.

I used only a fraction of the ingredients listed above, and I would estimate that it cost me about $1.40 for two full-sized portions. 

Method

Cook pasta according to directions on box, strain and run cold water over it.  Put pasta into a bowl with chopped vegetables (I usually use carrots, celery, cucumber, tomatoes, onion, garlic...  Whatever you have) and add oil and vinegar, lemon juice or your favorite salad dressing.  Add cheese (Again, whatever you have.  For lower calorie and fat options, use a hard cheese such as parmesan, romano or asiago.  The flavor is stronger so you won't need as much).  Toss together and serve.

Tuesday, February 8, 2011

Coq Au Vin


Here's how to make coq au vin we had for dinner the other night.  I know it sounds fancy but don't be intimidated.  It's basically a rustic, country-style chicken stew.

This dish traditionally calls for Burgundy wine, bacon or salt pork, mushrooms and pearl onions.  None of which I had.  But, that's okay.  It's supposed to be rustic.  If I went to the store and spent another fifteen dollars to make it, I think it would kind of defeat the purpose.  If you want to go all-out, Ina Garden has a good recipe over at the Food Network.


Here's what I had:
  • Four chicken thighs (you can use any type of chicken parts but bone-in is highly recommended)
  • Leftover Rex-Goliath Cabernet Sauvignon - about 3/4 cup (Burgundy is traditional, but any red wine that isn't really sweet works)
  • One limp carrot (My mom says you can re-hydrate it by putting it in water.  Who knew?).  Peeled and rough chopped
  • Half a small onion, rough chopped
  • Flour, 1 Tablespoon
  • Butter, 1 1/2 Tablespoons plus a another Tablespoon extra to finish sauce with
  • Thyme and Rosemary from my pot garden (Fresh is better by dry works)
  • Bay leaf
  • A can of Chicken Stock (Not totally necessary, especially if you are using bone-in chicken, but highly recommended)
Method

Set a pot, that has enough surface area to hold all the chicken parts without them overlapping, on medium to medium-high heat with about 2 Tablespoons of oil.  Pat the chicken dry, season with salt and pepper and place into heated pot skin-side down. 

***
Once the skin has browned, flip over and allow the bottom to brown.

***
Remove chicken from pot and discard the oil, except for about a Tablespoon of it.  Add carrot and onion, cook until slightly brown.  Return chicken to pot, add wine, chicken broth and herbs. 

***
Bring to a boil and then simmer for about an hour and half to two hours.  While the chicken is cooking, make a roux by melting 1 1/2 Tablespoons of butter into a small pan and adding 1 Tablespoon of flour.  Cook for two minutes over medium heat, stirring constantly, set aside.  Once the chicken has become tender, remove from pot and strain the liquid into another sauce pot.  Bring to a boil and add the roux.  Lower the temperture to about medium heat and simmer until the sauce has a nice gravey-like consistency.  Season with salt and pepper and stir in a little dab of butter for richness.  Serve with roquefort potato gratin or mashed potatoes.